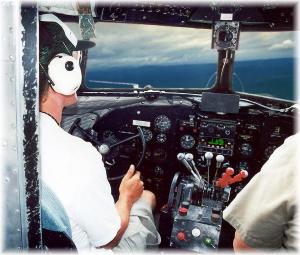
Here I am flying Left Seat, N763A
After digesting all that is here, there is another link at the bottom of this page that will take you to "The Online DC-3 Aviation Museum" direct to there page, containing even MORE DC-3 Technical Data, Pilot Training Manuals and Tips, today's DC-3 Operating Costs and a HUGE wealth of information on Flying the DC-3, so please don't miss those.
You will want to gain
as thorough understanding as possible of the way that such aircraft operates if
you're planning on flying one yourself. Most people wouldn't even enter into a
game of poker without a detailed
understanding of the rules, so you certainly shouldn't consider flying the DC-3
without getting your head round all the available information. Read on to find
out more.
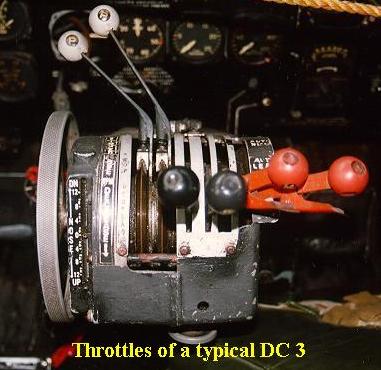
Take a look at the above picture of a typical DC-3 throttle quadrant.
On the left we have the PROP pitch controls, pushing these forward will increase PROP RPMS.
In the middle we have the POWER throttles, pushing these forward will give more power measured as Manifold Pressure in Inches.
On the right we have the MIXTURE controls, pushing these forward makes the Fuel Mixture richer. There are 4 settings and Notches that the MIXTURE controls slide into. They are (if you push forward on them from the bottom) IDLE/CUT OFF, AUTO LEAN, AUTO RICH and FULL RICH.
At the very far left is the TRIM wheel (Nose up and Nose down).
There are three small throttles behind the Mixture controls, these are the CARB HEAT controls and the carb heat locking lever.(Carb Heat is rarely used except in extreme cold conditions).
Underneath the quadrant and directly under the POWER throttles, you can
see a small wheel, this is the friction control for the POWER throttles. By
tightening this wheel, it will keep the POWER throttles at the same setting. also underneath is a lever to lock the tail wheel used on take-off's and parking.
The Throttle quadrant is the brains of the DC-3 and there is a certain way it has to be used during flight, that is, depending on the type of engines, and most engines types are covered here.
The DC-3 Engine Run-Up Check List
Exterior:
1. Bird nests: Check in Rudder hinges, Aileron Hinges, Carb Airscoop, Cylinders. Check lower cowl for trash.
2. Cowl latches: secure, Cowl flaps open.
3. Gear Pins in?
4. Props: walk through 12 blades.
5. Battery cart: plugged in, clear of props?
6. Gust locks: Elevators free!, ailerons and rudder optional.
Cockpit Set-up
1. Parking brake set, pressure up (at least 500 psi)
2. Hydraulic Quantity: Pressure up, sight glass low.
3. Mags Off
4. Battery Selector: Battery Cart, "Do Not Taxi" light on?
5. Mixture: Idle/Cutoff
6. Fuel tank selectors: Choose your tank.
7. Props: "Forward For Fine Pitch" (low pitch, high RPM)
8. Throttles: open 1/2 inch
9. Carb heat : cold
10. Landing Gear: neutral, Latch Handle down.
11. Flaps: Up, Handle neutral
12. Firewall Shutoff: It's still in the Open position?
13. Cowl Flaps: Full Open, selected off?
14. Fuel Boost pumps: On, 14 psi? , prime pressure drop?
15. Magneto Master Button: In?, Left and Right switches off?
Engine Start:
1. Clear Prop, response
2. Palm Switch, get ready to do a 3 finger Chord
3. Crank Starter: middle finger.
4. 6 Blades: Mags On Both Mags on: Ignition Booster on (ring finger)
5. Prime at one second intervals (index finger)
7. As engine fires up, Release Starter. Mixture to Auto Rich, occasional prime. Release Ignition Booster
8. Oil Pressure: indicating within 30 seconds
9. RPM: less than 800 until oil pressure established.
Idle Checks:
A. Engine Fuel Pump pressure: Switch off boost pumps. Low pressure lights off?
B. Vacuum gauge: Above 2, near 5 inches Mercury. Flight Instruments coming to life?
C. Oil Pressure: lights off, pressure coming down as engine warms up. Oil temp coming up? 40 Celsius is good.
D. Generator Cut in: At about 1300-1400 RPM. Switch to Ship's Battery, watch amps. No Voltmeter in cockpit. Ours in on the Radio Rack, with the Circuit Breakers, for field flashing.
E. Carb Heat: does it rise?
F. Cycle prop: Oil Temp above 40 Celsius? RPM above 1200?
G. Hydraulic pressure: Got some?
H. Note idle Manifold Pressure, Idle speed 500 rpm.
Mag Checks are done at Field Barometric pressure.......30 inches mercury. 40 Rpm drop on one mag is normal, more than 65 RPM is out of limits. Look for 2350 RPM +/- 50. Wind factor 2 rpm per mph.
Engine Burnout for Wright engines:
Mixture: Auto Rich, Prop: Full forward (high RPM)
Yoke: Pull it back and hold it to keep the tail down.
Throttle: Advance to 36 inches Manifold Pressure, 1 second per 100 RPM. Retard to idle, hold 15 seconds. Advance to 36 inches ( in a 10 second count) Back to Field Barometric Pressure
Mags: check RPM drop.
note: after burnout, use auto-lean for operation below 1600 RPM.
Shut Down:
1. Check Vacuum gauge as each engine is shut down.
2. Check hydraulic pressure after first engine is shut down. Cycle flaps to check if second engine Hydraulic pump is working.
3. RPM: Check for 10 RPM rise from idle speed when mixture is cut off.
4. Check Fuel, Oil, Vacuum lights come on during shutdown.
I read down the checklist and wanted to explain a few items, in the way I worded them for my convenience, and, so I could get it all on a page.
The "Do Not Taxi" light is a holdover from my 727 class. If the External Power / Battery Cart is plugged in (even if it's not selected) an amber light comes on above the mag switch. If the light is on, "Do Not Taxi". You'll hurt something, you're still plugged in. "Hydraulic pressure up, sight glass low": When the hydraulics are pumped up, the level in the sight gauge decreases. All the Douglas airplanes I've played with have a noticable volume decrease as pressure comes up. I'm reminding myself to make sure we don't run out of red juice. Just to be safe, "Parking Brake Set? Pressure Up?" An airplane rolling away unexpectedly IS scary. The "3 finger chord" refers to the way our engine selector switch is set up. We have a gang bar connecting a trio of 3 position switches. The gang bar selects the left or right engine. With my palm I push right, or pull left to direct my starter / ignition booster/ primer efforts to the Captain's, or Copilot's engine. Ok, so the palm of my right selects the engine, then the 3 middle fingers play the switches. Any radial engine-run mechanic develops the skill. "Mags On, Ign Booster On" once the mags are on, hold down the Ignition Booster. It delivers a shower of sparks to the forward spark plugs for starting.
The Engine run-up Check List was written by "Buzz" Meyer.
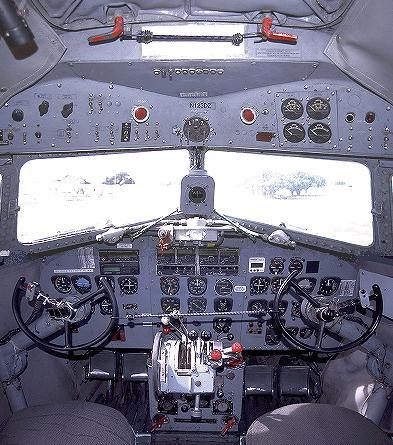
A Typical DC-3 Cockpit and you can see exactly where the Throttle Quadrant is situated in relation to everything else.
DC-3 Throttle's Management
In the 1940's to 1970's, POWER was set at 48 inches of Manifold Pressure (full power) during take off and MIXTURES were then set at FULL RICH. However, the following settings are used for flying a lot of DC-3's today. Note, the debate still continues over the use of de-rated power for take-off in a DC-3 and therefore, there are a lot of DC-3 pilots who prefer to use Full power at 48 inches of Manifold Pressure for take-off. It has been found of late, that de-rated power take-off's can cause the piston rings to break, because they create a ridge at each end of the cylinders end walls, thereby, when ever full power is needed such as a "single engine out emergency" problem may occur with engine cyliners caused by breakage of the piston rings. Incidentally, Pratt & Whitney endorse the use of full power contrary to there own report in 1953 advising to use de-rated power at the time.
For Take-Off and Climbing the order of use with the throttles is : PROPS - POWER - MIXTURE.
For TAKE OFF (the tail wheel will be locked) the settings are:
Cowl flaps are OPEN.
PROPS 2700 rpms (the props are pushed all the way forward).
The POWER throttles are set at 48 inches of Manifold Pressure
The MIXTURES are positioned at AUTO RICH (FULL RICH is used if one engine fails).
There are then 3 main throttle settings until reaching cruise. With Cowl flaps in TRAIL position, and climbing at 700 feet per minute, they are as follows:
At 90 knots, PROPS are reduced to 2550 rpms, POWER is reduced to 40 inches of Manifold Pressure and MIXTURES stay at AUTO RICH.
At 110 knots, PROPS are reduced to 2350 rpms, POWER is reduced to 36 inches of Manifold Pressure and MIXTURES at AUTO RICH
At desired flight level or Cruise, PROPS are reduced to 2050 rpms, POWER is reduced to 30 inches of Manifold Pressure and MIXTURES are reduced to AUTO LEAN. Cruise speed here can be (depending on winds) up to 165 knots, indicated airspeed. (Wind only affects ground speed of course).
A further reduction can be made for longer flights at Cruise, PROPS are reduced to 1750 rpms, POWER is reduced to 25 inches of Manifold Pressure with MIXTURES at AUTO LEAN.
A DC-3 without Superchargers (double blowers, high and low) would officially operate at no higher than 10,000 feet ASL (above sea level). Although it has been known to climb as high as 14,000 and even 16,000 ASL lightly loaded.
A DC-3 with the De-icing boots and De-Icing fluids removed is said to cruise at an extra 14 knots airspeed.
For Descending and Landing the order of
use with the throttles is : POWER - PROPS - MIXTURE.
Pattern Speed is usually maintained at 110 knots (indicated airspeed). Cowl Flaps are TRAIL
During Approach Cowl Flaps are TRAIL (Open cowl flaps produce a pronounced buffet) and usually at the Outer Marker the following power settings are used:
POWER can be reduced as necessary below 100 kts, PROPS are PROPS are reduced to 1800 to 2000 rpms (depending on load), MIXTURES are set at AUTO RICH. As the throttles are closed for landing, the props are advanced full forward. This is a precaution for a go around before landing, here, and in an emergency, only the POWER throttles are going to be pushed forward to 48 inches of Manifold Pressure. There are certain anti-backloading procedures to follow regarding power reductions at certain airspeeds to prevent the props from driving the engines (putting a backload on the gearbox and main bearings.
Usually a landing would be made on the main wheels, very rarely is a three wheel landing made. Never make a three point landing in a DC3. The wing effectively blanks out the airflow over the rudder in the three point attitude and the fuselage is weakest at the door. A botched three point landing is a good way to damage the tailwheel structure and fuselage around the cabin door.
Landings would be made at just above stall speed at about 70 knots
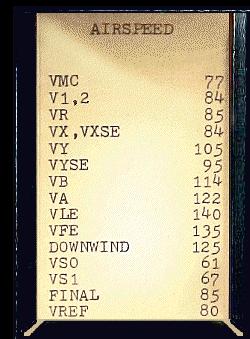
Stall Speeds for the DC-3 are :
With FULL FLAPS about 58 knots and with NO FLAPS about 65 knots
The following are the Landing Gear and Flap settings :
Landing Gear down at no more than VNE.
10 degrees flaps at 130 kts.
20 degrees flaps at no more than 105 knots.
30 degrees flaps at no more than 99 knots.
40 degrees flaps ( full) at no more than 97 knots.
FULL flaps at no more than 95 knots.
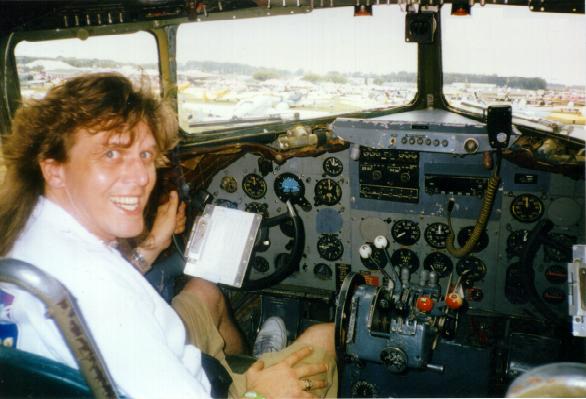
I am pictured here at "Oshkosh"
1997, inside the cockpit of a C-47 (The Black Sparrow).
Rotation speeds and Short take-off's
Safe single engine speed is 84 knots. Rotate at 85 knts. Minimum control speed is 76 knts.
20 degrees flaps can be used for shorter runways.
These settings are for Pratt & Whitney R1830-92 engines only.
By Robert Campbell
(See further below for 1830-94 and -75 settings as they are slightly different).
R1830-92 engines
For TAKE OFF (the tail wheel will be locked) the settings are:
Cowl flaps are TRAIL. PROPS 2700 rpms (the props are pushed all the way forward).
The POWER throttles are set at 48 inches of Manifold Pressure
The MIXTURES are positioned at AUTO RICH
There are then 3 main throttle settings until reaching cruise. With Cowl flaps in TRAIL position, and climbing at 700 feet per minute, they are as follows:
At 90 knots, PROPS are reduced to 2550 rpms,
POWER is reduced to 40 inches of Manifold Pressure and MIXTURES stay at AUTO RICH. This is called METO power (maximum except Take-off and is available continuously wereas MAX Power is limited to 1 minute.
At 110 knots, PROPS are reduced to 2350 rpms, POWER is reduced to 36 inches of Manifold Pressure and MIXTURES at AUTO RICH
At desired flight level or Cruise, PROPS are reduced to 2050 rpms, POWER is reduced to 30 inches of Manifold Pressure and MIXTURES are reduced to AUTO LEAN. Cruise speed here can be up to 150 knots, indicated airspeed. Wind only affects ground speed A further reduction can be made for longer flights at Cruise, PROPS are reduced to 1750 rpms, POWER is reduced to 25 inches of Manifold Pressure with MIXTURES at AUTO LEAN.
A DC-3 without Superchargers would operate at no higher than 16,000 feet ASL (above sea level). Flying the Minimum Enroute Altitude over the Rockies will dictate altitudes of 13-14,000 feet.
For Descending and Landing the order of use with the throttles is :
POWER - PROPS - MIXTURE. Pattern Speed is usually maintained at 110 knots (indicated airspeed).
Cowl Flaps are TRAIL
Also during Approach Cowl Flaps are TRAIL (Open cowl flaps produce a pronounced buffet)
At the Outer Marker the following power settings are used:
POWER (Manifold Pressure) can be reduced to as low as necessary below 100 kts., PROPS are reduced to1800 to 2000 rpms (depending on load),POWER (Manifold Pressure) can be reduced to as low as necessary below 100 kts., PROPS are reduced to1800 to 2000 rpms (depending on load), MIXTURES are set at AUTO RICH. As the throttles are closed for landing, the props are advanced full forward. This is a precaution for a go around before landing, here, and in an emergency, the throttles are going to be pushed forward to 48 inches of Manifold Pressure. There are certain anti-backloading procedures to follow regarding power reductions at certain airspeeds to prevent the props from driving the engines (putting a backload on the gearbox and main bearings.
Usually a landing would be made on the main wheels, very rarely is a three wheel landing made.
Never make a three point landing in a DC-3. The wing effectively blanks out the airflow over the rudder in the three point attitude and the fuselage is weakest at the door. A botched three point landing is a good way to damage the tailwheel structure and fuselage around the cabin door.
John Pappas says... Not to 'muddle' the water,.. on the matter of three pointing the DC-3. It can be done reasonably safely if one is practiced at it AND it will put more stress on the airframe if not done correctly (remember, we are paying for repairs now, not Uncle !!). Also, there just is not the directional control with the tail down as w/ the tail up. We don't do it because of the foregoing and, with the length of runways we use, there is simply no need. Our runway at AJO is 3,200' and I feel comfortable at a whole lot less before I would feel that I needed to '3 point' it. One other 'thing' about the procedures in regard to using power. We NEVER reduce the MP below the RPM until the final reduction as the landing is assured. To reduce the power earlier invites the propeller to drive the engine and starve the main bearings of oil - this regardless of the speed of the aircraft - but especially if the speed is higher. If there is any question about this, the next time you fly, put the props full forward on downwind or at the outer marker, hold 100 kts and pull the power off to get down - you can actually hear the lugging of the engines. Proper use of the flaps w/ a MP setting no lower than the RPM will allow for a very nice descent rate. The above is not critical just how we do it at DreamFlight and how I have done it over the years.
80 to 85 kts. over the fence. Landings would be made at just above stall speed at about 70 knots
Stall Speeds for the DC-3 are :
With FULL FLAPS about 58 knots and with NO FLAPS about 65 knots
The following are the Landing Gear and Flap settings :
Landing Gear down at no more than Vne. There is no gear extension speed on a stock DC3. Those with gear door mods have gear speeds. 10 degrees flaps at 130 kts. 20 degrees flaps at no more than 105 knots. 30 degrees flaps at 99 at no more than knots. 40 degrees flaps at no more than 97 knots. 40 degrees is full.
Rotation speeds and Short take-off's Safe single engine speed is 84 knots. Rotate at 85kts. Minimum control speed is 76 kts. 20 degrees flaps can be used for shorter runways.
Balance brake force with aft control wheel (up elevator).
DC-3 Fuel Usage, Both Engines combined:
Take Off - 310 gallons per hour
Initial Climb - 245 gallons per hour
Normal Climb - 107 to 125 gallons per hour
Cruise - 90 gallons per hour
Some differing opinions and interesting information:
John Pappas from DreamFlight (DC-3 Rose) says.... Not to 'muddle' the water but everyone is pretty much correct (except when the word 'never' is used) on the matter of three pointing ( all 3 wheels touching down at the same time) the DC-3. It can be done reasonably safely if one is practiced at it AND it will put more stress on the airframe if not done correctly (remember, we are paying for repairs now, not Uncle !!). Also, there just is not the directional control with the tail down as w/ the tail up. We don't do it because of the foregoing and, with the length of runways we use, there is simply no need. Our runway at AJO is 3,200' and I feel comfortable at a whole lot less before I would feel that I needed to '3 point' it.
Robert Cambell also quotes the following......
There are a several reasons for not using less than full rated power for all takeoffs.
1. The distance the pistons travel in the cylinders (stroke) is related to the power used. The piston rings, over time, wear a ridge into the cylinder wall at the top and bottom of the stroke, If 42" is used for takeoff, the bottom ridge will develop further up the piston wall than in an engine that has seen rated power for Takeoff. If the time comes when full rated power is needed (short runway, engine failure, etc.) and a power setting greater than 42" is used, the piston is now forced past the ridge in the cylinder created by many hours of using de-rated power. Forcing the piston rings past this ridge can cause them to break.
2. There is an enrichening feature on the carburetor which activates at 45" for additional cylinder cooling on takeoff.
3. The point is to get to takeoff safety speed and get airborne as soon as possible. If you are using de-rated power, all your accelerate / stop charts are worthless. If you have an engine failure at V1, you have much less runway still ahead of you than you would if you had used rated power. All of your single engine climb numbers are based on use of rated power. See #1. If you have an engine failure, and you need to go to 48" on the good engine, you may have a double engine failure because of newly broken rings on your remaining engine. Also, if you use 48", you have one less thing to do. You are already at full power.
4. In a commercial operation, the FAA mandates use of full rated power for takeoffs.
5. The engines will last longer when run at full rated power. United proved this in the 1940s.
I have had this discussion with many pilots and mechanics, and I know that there are many differing opinions. My experience is with commercial DC-3 operations, and with airplanes which flew over 100 hrs per month and mostly at, or dare I say over, gross weight Most engines made TBO of 1200 hrs. If we had failures, they were with relatively new engines, and the fault was with the overhauler.
I would venture to say that hobby airplanes are rarely flown at gross weight or in the same conditions.
As to your own DC-3, don't remove the stops, but, also, don't ever take that airplane to Jefferson County, CO or Laramie, WY, you'll run off the end of the runway trying to get airborne. On a non modified throttle quadrant, you'll hit the stops and be pulling 47.5" on takeoff from a 5,000 ft. elevation runway. If you look at the charts, that's exactly rated takeoff power for that altitude on a standard day.
And John Pappas of Dreamflight had this to say....
Well, now you are a part of the DC-3 / C-47 mystique - lots of aircraft, lots of pilots and lots of ways to do things. You will get opinions both ways - even several ways (sic) - as to why and why not to use reduced power on T/O. We have used reduced power for years and never had a problem. Personally I use it because the time for MAXIMUM POWER is limited to 1 minute - a really short time considering the T/O sequence - especially when heavy. Also, there is just no reason to have to use MAX PWR under normal circumstances.
Some will say that it provides better cooling, that you get to a safe altitude faster so you can then use METO power, etc. I have just never found that to be the case. The only time I have ever used MAX PWR is on very short strips under adverse conditions. If there is an engine failure at V1/2 it is a simple thing to increase the power on the other engine. In reality - everyone out there (here) - how many of you have ACTUALLY had an engine failure at V2 (be honest, now)? I will bet a free flight that you will be able to count the number on one hand !! And this comes from literally 10's of thousands of hours combined for all of those who are reading this.
As to the PH-DDA accident I believe that the aircraft was under control for at least a short time prior to the problem with the engine. Apparently the solenoid did not release the prop feather button so the prop continued, as it was designed, to bring the prop on the bad engine out of feather. This caused a great deal of drag but did not cause the accident. (That DC-3 was going to go down, regardless, w/ one blowin' and one windmillin' at gross weight) The aircraft apparently stalled, went nose down and impacted the water (only 4'). The crew died from blunt trauma but the pax's all died from broken necks - the result of impact in a near vertical dive.
Sorry to say, this is one of the incidents that we use in pilot training school as to 'what not to do' in an emergency. First, the prop feather button can and should be manually pulled out if it does not 'pop out' after the prop feathers. This should be an added line on the emergency Engine Shut-down checklist and is required on our training - the pilot on whose side the prop is to be feathered is to make certain the button pops out after the prop feathers !!
Secondly, a DC-3 should NEVER be allowed to stall and descend un-controlled. There is just no reason for that to happen except for the failure of the pilots to manage the aircraft. The PH-DDA crashed in 4' of water - an easy and certainly survivable site for everyone to have escaped serious injury if the pilots had done their job. When you compound the fact that the feather button failed with an a/c that if not over gross, then certainly real, real close you have a disaster in the making if proper procedures are not followed.
Are you aware of the AD that requires a test of the feather button solenoid 'pop-out' feature every 30 days? Most operations rarely abide by this AD and many do not even check the operation of the feather button before EACH and EVERY FLIGHT. Oh, well ....
Certainly don't want to sound like we 'know it all' which we do not, but, at least in regard to the PH-DDA situation, proper piloting would have saved the lives of many, many people. As to the use of MAX PWR, everyone will have a different (or at least their own) thoughts on this - most of which will be correct - and the other part it won't make any real difference anyway
David Caverner says.... About cylinder ridges... It is my opinion that there at least two other major factors which make a partial power take-off unwise.
1. The continuation of a takeoff in a single engine situation requires rated power, I have been involved in DC-3 flight test on and off since the 1960s and I will guarantee that you do not have a prayer or time to try with partial power. This includes the DC-3s that we have certified with auto-feather.
2. The cylinder head temp. probes are not able to give a true picture of heat extremes during take-off. (the extra enrichment supplied by full throttle -max power results in substantially lower CH temperatures).
Rob Campbell says.... One other 'thing' about the procedures in regard to using power. We NEVER reduce the MP below the RPM until the final reduction as the landing is assured. To reduce the power earlier invites the propeller to drive the engine and starve the main bearings of oil - this regardless of the speed of the aircraft - but especially if the speed is higher. If there is any question about this, the next time you fly, put the props full forward on downwind or at the outer marker, hold 100 kts and pull the power off to get down - you can actually hear the lugging of the engines. Proper use of the flaps w/ a MP setting no lower than the RPM will allow for a very nice descent rate.
The DC-3 with a single stage blower can stagger up to 14 or 15,000 ft. The hot days at high altitude fields are a problem. The airport might have less runway than the distance required for takeoff. The trick is to get airborne early in the morning when the air is cooler.
A rule of thumb for power loss is 1" of manifold pressure (and therefore atmospheric pressure) per 1,000 ft. A normally aspirated engine can deliver about 30" of manifold pressure at sea level. At a 5,000 ft asl airport, only 25" would be available, so you have thinner air and less power available. At 5,000 ft. the DC-3 can pull 47.5" for takeoff, but that's it, the throttles are at the stops.
DC-3s aren't unique here, all aircraft are affected by density altitude. When you read about some Cessna crashing on takeoff at Lake Tahoe on a hot day, you can bet the pilot was a flat-lander who took the family to see the big lake in the mountains and then wanted to get home before dark. So he takes off at the hottest part of the day when the heat gives the 5,000 ft asl field a density altitude of 8,000 ft. As he is crawling down the runway, he travels the distance that he normally does at sea level and pulls back on the wheel, the aircraft stalls, falls off into the start of a spin and crashes by the side of the runway. Fortunately, more attention is given to high altitude airports and density altitude now during primary instruction. However, all the instruction in the world is no substitute for the experience of performing a takeoff at a high altitude field on a hot day.
The acceleration during the takeoff roll is very slow; the take off distance is very long; it seems to take forever for the airspeed indicator to reach the number required for liftoff, and, once you get airborne, the climb performance is truly anemic. The trick is to be patient and watch your airspeed. The same indicated airspeeds are required.
Another rule of thumb (with Wright engines) was to use about 21" and 100 knots as a "baseline" then add one inch MP for every 10 knots above that. Works out about the way your rule does. Just to put the concept of "backload" as you call it, in automotive terms, I think about being established in cruise and downshifting a gear at a time as with a manual transmission used to help slow down the car. Just as you would not want your car to be travelling down HWY 101 at 65 then abruptly downshifting into first without first decelerating significantly (makes more sense to downshift slowly through 4th, 3rd, 2nd as one bleeds off speed-- and energy).
After using full rated takeoff and climb power, if you're not in a hurry (and who in a DC 3 is in a hurry?) use 27" or 28" and 2150 rpm in cruise.
What about descent and approach to landing? This is a flight regime in which much damage can be inflicted on the engines by reducing power too quickly.
Most round engine drivers and those who have a great interest in the old birds have heard the term "backlash" or "backloading". It refers to the prop driving the engine. This can occur in a descent at low power settings. When the prop drives the engine, all the forces on the bearings and gearbox are reversed, and this is what causes the damage. The bearing surfaces and the gearbox are not designed for these opposite pressures.
So...to keep the engine driving the prop, here are some airspeed guidelines. Above 140 kts. IAS...keep at least a 5" spread (ex. 2150 rpm / 26.5" map); 100 to 140 kts., at least square (ex. 2150 rpm / 21.5" map). Manifold pressure should not be allowed to go below the corresponding rpm until the airspeed is below 100 kts.
Another guideline on power reduction is no more than 2 inches every 2 minutes. This assures gradual cooling.
Another good practice is to make all power changes very slowly. The old gauges take a while to register the new power settings, and there are a lot of moving parts in the engines which need time to adjust.
The term I learned back in the 70s when I started flying 3s was "backloading". In addition to starving the bearings, the loads on the bearings are reversed. The master rod bearing is the one most prone to damage. Also the loads on the prop reduction gears are reversed. All it takes is one incident to ruin an engine.
The rules we live by are:
Above 140 kts IAS... MP at least 5" above square.
Above 100 kts IAS... MP at least square.
Below 100 kts IAS... MP can be reduced below square.
I never found any reason to go below square until flair for landing.
Flying night cargo and fitting into LAX traffic with the jet freighters, we got real creative on flying fast approaches 150 kts. at the OM was not uncommon. Gear down at 150 to 160 kts., then 1/4 flaps at 130, and judicious reduction of MAP and RPM together to avoid backloading. With 11,000 feet of runway, we'd cross the fence at 100 kts, then go to full flaps, land and turn off at mid field.
One has to adapt to the modern world. It's great that the DC 3 is so adaptable.
Julie Holtz contributed the following comments....
I would like to say that using the brakes while the tail is up will result in a nose over is a myth- if done properly. As a new copilot, I watched the Captain land in a level attitude with the throttles closed, apply full brake effort and keep the pitch steady with alot of up elevator. As the brakes heated up (expander tubes, I do not know how the drum or disks behave) they faded. This resulted in a 1500' ground roll with weight around 24000#. I was not so brave, and would wait until the tail was down to put the brakes on, but still held aft yoke to keep the tailwheel on the ground. Several years later I was involved in writing an Airplane Operating Manual for a new DC-3 Air Carrier Certificate, and researched several other operators manuals, AFM's, and millitary tech orders. Somewhere in the hunt, I found a statement that full brakes could be applied at speeds above 40 knots, below which the elevators may not be able to prevent a noseover. Makes sense to me, I flew with another Captain that stood a DC-3 up on the mains on a taxiway after applying brakes too hard with a tailwind. In my own experience as a company instructor for a freight operator, I have demonstrated that brakes are more effective with the tail up and flaps up. If heavy braking is used immediately after touchdown on the mains with the tail low or on the ground, the wing is at a large angle of attack and producing some, albeit not much, lift and the tires will skid. Conversely, holding a level pitch puts all of the weight on the mains, and reduces angle of attack so very little lift is produced by the wing, and the brakes can be held to the floor with lots of up elevator and a short ground roll made. I teach my pilots to either have the tail up or down during rollout. Up gives rudder effectiveness, down lets the tailwheel help with directional control. It is when the tail is just barely off of the runway that all of the "fun" happens if the brakes are uneven or if a gust of wind comes along. DISCLAIMER ABOUT BRAKES: Each plane I have flown has had a different sensitivity to the brakes and yours might tend to noseover if pedals are held all of the way down! I have only used expander tube brakes. About three pointers: I think they are fun to do on a calm day or night with an empty airplane, but if flare height is wrong it will be a big BOUNCE or a hard DROP. The main reason I do not do them more than a few times a year, or permit my FO's to do it is that a go-around might be difficult to safely accomplish. Unless you are very strong, slowing down for the landing requires nose up trim to the degree that a go-around would be a quick stall entry. Since stall speed is so low, we are also way below VMC, and directional control would be a hand (foot) full if the engines don't both come up to power equally. Finally, crosswinds add just that much more work. I have held full rudder and lots of aileron to keep it going straight down the centerline. Apart from all of the bad, it feels pretty neat to feel the plane land as the elevator reaches the aft stop, and looks cool to be so high going so slow in the flare. I use the same power settings as you do with -92 and -90D engines and have had good luck. We do not go below 20" without reducing RPM at any time except for roundout and flare. Have you noticed how quiet it is at 1700RPM in flight?
Buzz Meyer who is restoring a DC-3 in the livery of Eastern Airlines to flying condition had this to say..... In Short, operating costs are approximately $450 to $550 per hour, depending on what you set aside for engine and airframe overhaul. You would burn 90-100 gallons of fuel per hour, and 2 gallons of oil per hour. A DC-3 is about the least expensive large airplane that a couple guys can afford to work with. Parts are generally available. Skilled DC-3 mechanics are getting rare, and DC-3 pilots can still be trained at about $650 per hour for lessons.
Truth or Myth ?
If you use brakes in a DC-3 whilst the tail wheel is still in the air (usually after a main wheel landing), the chances are, your DC-3 will nose over. I have seen some pictures of a Delta Airlines DC-3 at Chicago's Midway Airport where this happened. A Crane had to be brought in to right the DC-3 onto it's wheels again.
I once heard a story that some of the more experienced C-47 pilots were able to bring a DC-3 to a complete stop after a main wheel landing and BEFORE the tail wheel had touched the runway.
Balance brake force with aft control wheel (up elevator).
These settings are for Pratt & Whitney R1830-94 and 75 engines only.
BEFORE STARTING ENGINES
0=Hydraulic Fluid Level - Normal
1=Hydraulic Pump Selector - Left
2=Allowable T.O. Weight - Checked
3=Gear Latch - Down and Locked
4=Flap Handle - Up then Neutral
5=Gear Handle - Neutral
6=Battery Switch - On
7=Generators - On
8=Fuel Gauges - Amount of Fuel
9=Cowl Flaps - Open
10=De-Icers - Off
11=Anti-Icer Pumps and Valves- Off
12=Automatic Pilot - Off
13=Lights - On (night only)
14=Flight Controls - Free
15=Carburetor Air Filter - Unfilter, then locked
16=Crossfeed - Off
17=Trim Tabs - Neutral
18=Parking Brake - On
19=Tailwheel - Locked
20=Throttle Friction Brake - Snug
21=Oil Shutters - Adjust as Required
22=Carburetor Air - Cold
23=Fuel Selector - As required
24=Propellers - Full Forward, High RPM
25=Throttles - Cracked (or 5 keystrokes)
26=Mixtures - Idle Cut-Off (or 5 keystrokes)
27=Blowers - Low
28=Pitot Heater - Off
29=Inverter - On
STARTING ENGINES
0=Right Magneto Lever - Both
1=Right Fuel Booster Pump - On
2=Prime Switch - On Right
3=Call "CLEAR" to ground crew
4=Start Switch - ON RIGHT, 10 to 15 seconds
5=Right Vibrator Switch - On Right
6=Vibrator Switch - Off
7=Start Switch - OFF
8=Right Mixture - Auto-Rich
9=Right Prime Switch - OFF
10=Right Fuel Booster Pump - OFF
11=Repeat for Left Engine
BEFORE TAXIING
0=Crew and Passengers Aboard and Door Secured
1=Hydraulic Pressure - 850-900 psi
2=Radios - On, Checked
3=Altimeters - Set
4=Clock - Set
5=Gyros - Set and Uncaged
6=Flight Controls - Free
7=WHEN GIVEN TAXI CLEARANCE FROM CONTROL TOWER:
8=Parking Brake - Off
9=Tailwheel Lock - Unlocked
ENGINE RUN-UP
0=Parking Brake - On
1=Tailwheel Lock - Locked
2=Fuel Booster Pumps - Off
3=Oil Cooler Shutters - As Desired
4=Mixtures - Auto Rich
5=Cowl Flaps - Open then Off
6=Fuel Selector - All Tanks
7=Props thru Full Pitch Range
8=Feathering Switches - Check
9=Carb Heat - On, Check, Off
10=Generators - Check
11=Ignition- Each Engine - MP 30", Magnetos to L, BOTH, R, then back to BOTH
12=Hydraulic Pumps - Check
13=All Instruments and Gauges - Normal
BEFORE TAKEOFF
0=Mixtures - Auto Rich (Full Rich Used For Single Engine Emergency)
1=Cowl Flaps - Trail then Off
2=Oil Shutters - As Required
3=Propellers - Full Forward, High RPM
4=Gyros - Set and Uncaged
5=Fuel Booster Pumps - On
6=Friction Brake - Tightened
7=Tailwheel - Locked when lined up with runway
AFTER TAKEOFF
0=Landing Gear - Up (After Positive Climb Indication)
1=Wheels- Stop Rotation With Brakes
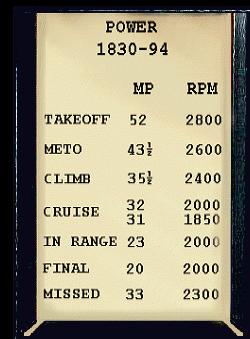
2=Accelerate to VY 105 KIAS then Reduce to MP 41", 2550 RPM
3=Fuel Booster Pumps - Off
4=At 500' AGL Reduce to 35.5", 2400 RPM
CRUISE
0=Cowl Flaps - As Required and Off
1=Mixtures - Auto Lean
2=Fuel Selector - To Desired Cruise Tanks
3=Oil Shutters - As Required
4=Adjust Power as Desired: Normal Cruise - MP 32" 2000 RPM, Economy Cruise - MP 31" 1850 RPM
BEFORE LANDING
0=Automatic Pilot - Off
1=Altimeters - Set
2=Fuel Selector - To All
3=Mixtures - Auto Rich
4=Carburetor Air - Cold
5=Fuel Booster Pumps - On
6=Ignition - Check
7=Propellers - Set 2000 RPM
8=Landing Gear - Down and Latched, Green Light, Check Wheels Visually
9=Tailwheel - Locked
10=De-Icers - Off
11=Parking Brake - Off, brake pressure on pedals
12=Flaps - As Desired
AFTER LANDING
0=Flaps - Up
1=Cowl Flaps - Open
2=Fuel Booster Pumps - Off
3=Elevator Trim - Neutral
4=Propellers - Full Forward, High RPM
5=Tailwheel - Unlocked
PARKING
0=Parking Brake - On (after chocks are placed, Off)
1=Ignition - Off
2=Mixtures - Idle Cut-Off
3=Fuel Selectors - Off
4=Radios - Off
5=Battery Switch - Off
6=Generators - Off
7=Landing Gear - Pins In
8=Landing Gear Handle - Down
9=Flap Handle - Up
10=Flight Control Locks - On
FLAP AND LANDING GEAR LIMIT SPEEDS
0=VLE-Landing Gear Extension Speed Limit - 140 Knots
1=Flaps 1/4 - 135 Knots
2=Flaps 1/2 - 99 Knots
3=Flaps 3/4 to Full - 97 Knots
These settings are for DC-3's with Wright Cyclone Engines Only.
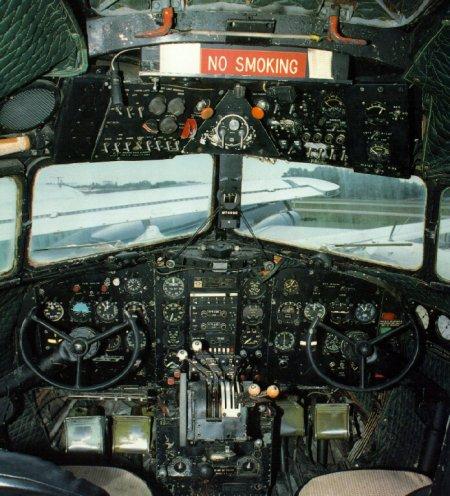
These figures are for Wright Cyclone GR-1820G-202A engines with 3:2 reduction gearing, but apply to most Wright engine types on DC-3's. Also of note, is that the throttle quadrant on a Wright Cyclone engine DC-3 is different, in that the Mixture controls are placed were the carb heat controls are on a normal DC-3 and the carb heat throttle controls are placed were the Mixture controls usually are. See the Delta Ship 41 DC-3 cockpit picture below for an example of this unusual throttle quadrant arrangement within the cockpit photo. A Wright Cyclone engine has a single bank of 9 cyclinders unlike the 2 banks of seven cylinders on a typical DC-3. Also, spares for Wright engined DC-3's are extremely rare to get, making maintenance on these types very difficult.
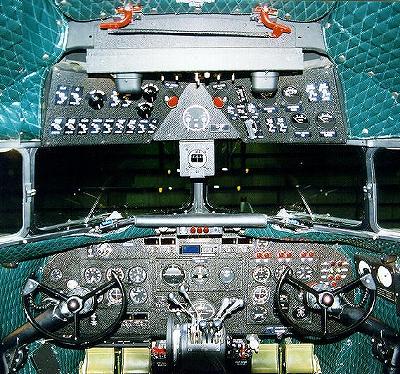
The excellent restored cockpit of Delta Air Lines "Ship 41" a Wright powered DC-3
Blower ratio is 7.0:1 single stage
Max take off weight is 25,200 lbs
Max fuel capacity is 822 us gallons
Max Oil capacity is 58 us gallons
Max range is 1400 statute miles
Cruise speed is approx 148kts
Take Off for one minute, use 45.5 in' MP and 2500rpm at 1200hp
Reduce after one minute to 43 in' MP and 2350 rpm at 1100hp
Cruise at 5,500 feet at 40 in' MP and 2400rpm at 1100hp
A further power reduction can be made for long-range cruise using 37.3 in' MP with props at 2300rpm with 1000hp.
Propellor blades used on a typical Wright Cyclone DC-3 would be:
Hamilton Standard with three 6153A-18 blades with 23E50 hubs.
The following specs on the SC47 might be of interest to you. Max allowable TO weight was increased to 32500 lbs. In order to give the desired range for a mission, fuel configuration included 4 x 200 gallon tanks in the fuselage. In the early months of 1956, a modification included the installation of elongated elliptical fuel cells in the wings--400 gallons each. The fuselage tanks were removed. Mission requirements for landing over an obstacle and restricted to a 1200 foot landing strip, necessitated that approaches be fairly steep, full flaps, a little above stall speed. The objective was to cut power off with a full stall, three point landing at touchdown, holding the stick back while applying full brakes--hard--for a few seconds. The tail would come up and then lower as back pressure was released. The only modification to the gear was the installation of a steel drag link. For TOs, we would set flaps, hold the brakes, apply full power briefly then release. You would hit the JATO button at 45 mph. The JATO lasted for 15 seconds, but you had pretty good speed and altitude (obstacle criteria) by then. The original unit was activated by SAC to provide recovery for downed aircrews. Low level flying tactics were part of the training for the unit. See this 45 year old picture of a SC-47 below.
Robert Moninger says.. Speaking of icing, the DC-3 let you know when you were in icing conditions. De-icing fluid (ethylene glycol) was applied to the props through slinger rings, and fair sized chunks of ice were thrown against the fuselage, which was re-enforced in the arc line of the props. The decibel level created quite a disturbance for both the passengers and, I must admit, the crew, varying in proportion to the intensity and duration of the icing condition. Other disturbing items: the wind-shield would accumulate a coating which could only be removed by (A) flying into warmer air (seldom happened) or (B) sliding open the side window and scraping it off with a putty-knife, stored in a leather scabbard on the bulkhead, behind the captain's head, not a pleasant chore In addition, airspeed would steadily decrease as the ice accumulated, sometimes to the point where altitude could no longer be maintained. To make it more exciting, chunks of ice would occasionally break off the cowling and find their way into the carburetor intakes, resulting in spasms of coughing and sputtering --- and that included the engines.
In late 1942 United contracted with the Air Transport Command for two areas of operation, to Alaska using C-47s, and to Australia, using C-87s. The Army Air Corps supplied the airplanes, United supplied the pilots and operating personnel. We were issued uniforms similar to those of the Army Air Corps but with unique insignia that no one in the U.S. military forces had ever seen before. This led to complete confusion as to who should initiate the saluting process. As we were essentially civilians, we weren't too proficient at saluting anyhow, so there were many awkward encounters.at the military airfields. I was assigned to the Australian operation but heard many tales of the indomitable C-47s and the crews who maintained a remarkable percentage of their schedule in some of the worst weather you can find anywhere in the world.
June,1943 - upgraded to Captain and was sent to Denver where United was operating a school for the Army Air Corps to transition cadets from single to multi- engine airplanes. We instructed around the clock flying C-49s, which were powered with Wright Cyclones and C-73s, which were P&W equipped. I personally much preferred the P&Ws. Four other United guys and I rented a large house in central Denver and since we were scheduled at all hours we needed an alarm clock. Augie Heldt was the only one among us with one, the problem being it was somewhat eccentric. It was an old "Big Ben" and gained ten minutes every hour and the alarm sounded six hours after the time the alarm was set for. Augie was the only one who could program it to go off at the desired time but it worked surprisingly well. We usually flew two sessions a day , two cadets at a time , 2 hours + per session. Since we weren't too closely supervised we managed to squeeze in some low level cross country , giving some farmers their first close-up of a gooney bird. One of our intrepid instructors, under guise of a cross -country to Colorado Springs added a little extra with a side trip UNDER the Royal Gorge Bridge. Only those who have seen this bridge can really appreciate this.
October 1943 - progressed to domestic MATS (Military Air Transport Service). We flew C-49s and C-47s to military air bases in the U.S. I was stationed in San Francisco and flew from there to Denver on a scheduled basis with stops at Sacramento and Ogden, Utah. The airplanes were G.I., the uniforms United Airlines, no funny insignia, no saluting. Next step, in April 1944, was to UAL cargo, flown in UAL cargo DC-3s with a big cargo door on the left side. All of our passenger DC-3s had the door on the right side although most other airlines had it on the left. I have never been able to learn why. Finally started flying passengers in the fall of 1944 and for the next and last year of the war, when flying was still on a priority basis has the privilege of carrying Jimmy Stewart, Eleanor Roosevelt, Bob Hope, Jimmy Doolittle and other well known people.
For information on How to Taxi a DC-3, I have a seperate section covering this, that can be accessed Here
For MORE technical data on "Flying the DC-3", DC-3 Pilot Training Manuals, Prop Feathering, FAA regulations concerning the DC-3, Gauges, Cockpit Panels, Technical drawings, layout and blue-prints, Operating costs of the DC-3, plus a much much more, you wont want to miss this HUGE wealth of information .. Click Here
Finally, if anyone thinks I have missed something out in the above details about flying the DC-3 or has any comments you think I should include, then drop me an E-Mail please. Your input would be very much appreciated.
E-Mail Trev Morson, WebMaster of "The DC-3 Hangar".